

This is a div block with a Webflow interaction that will be triggered when the heading is in the view.
- (Note: you can’t send yourself a test email from your work email to your work email address because.
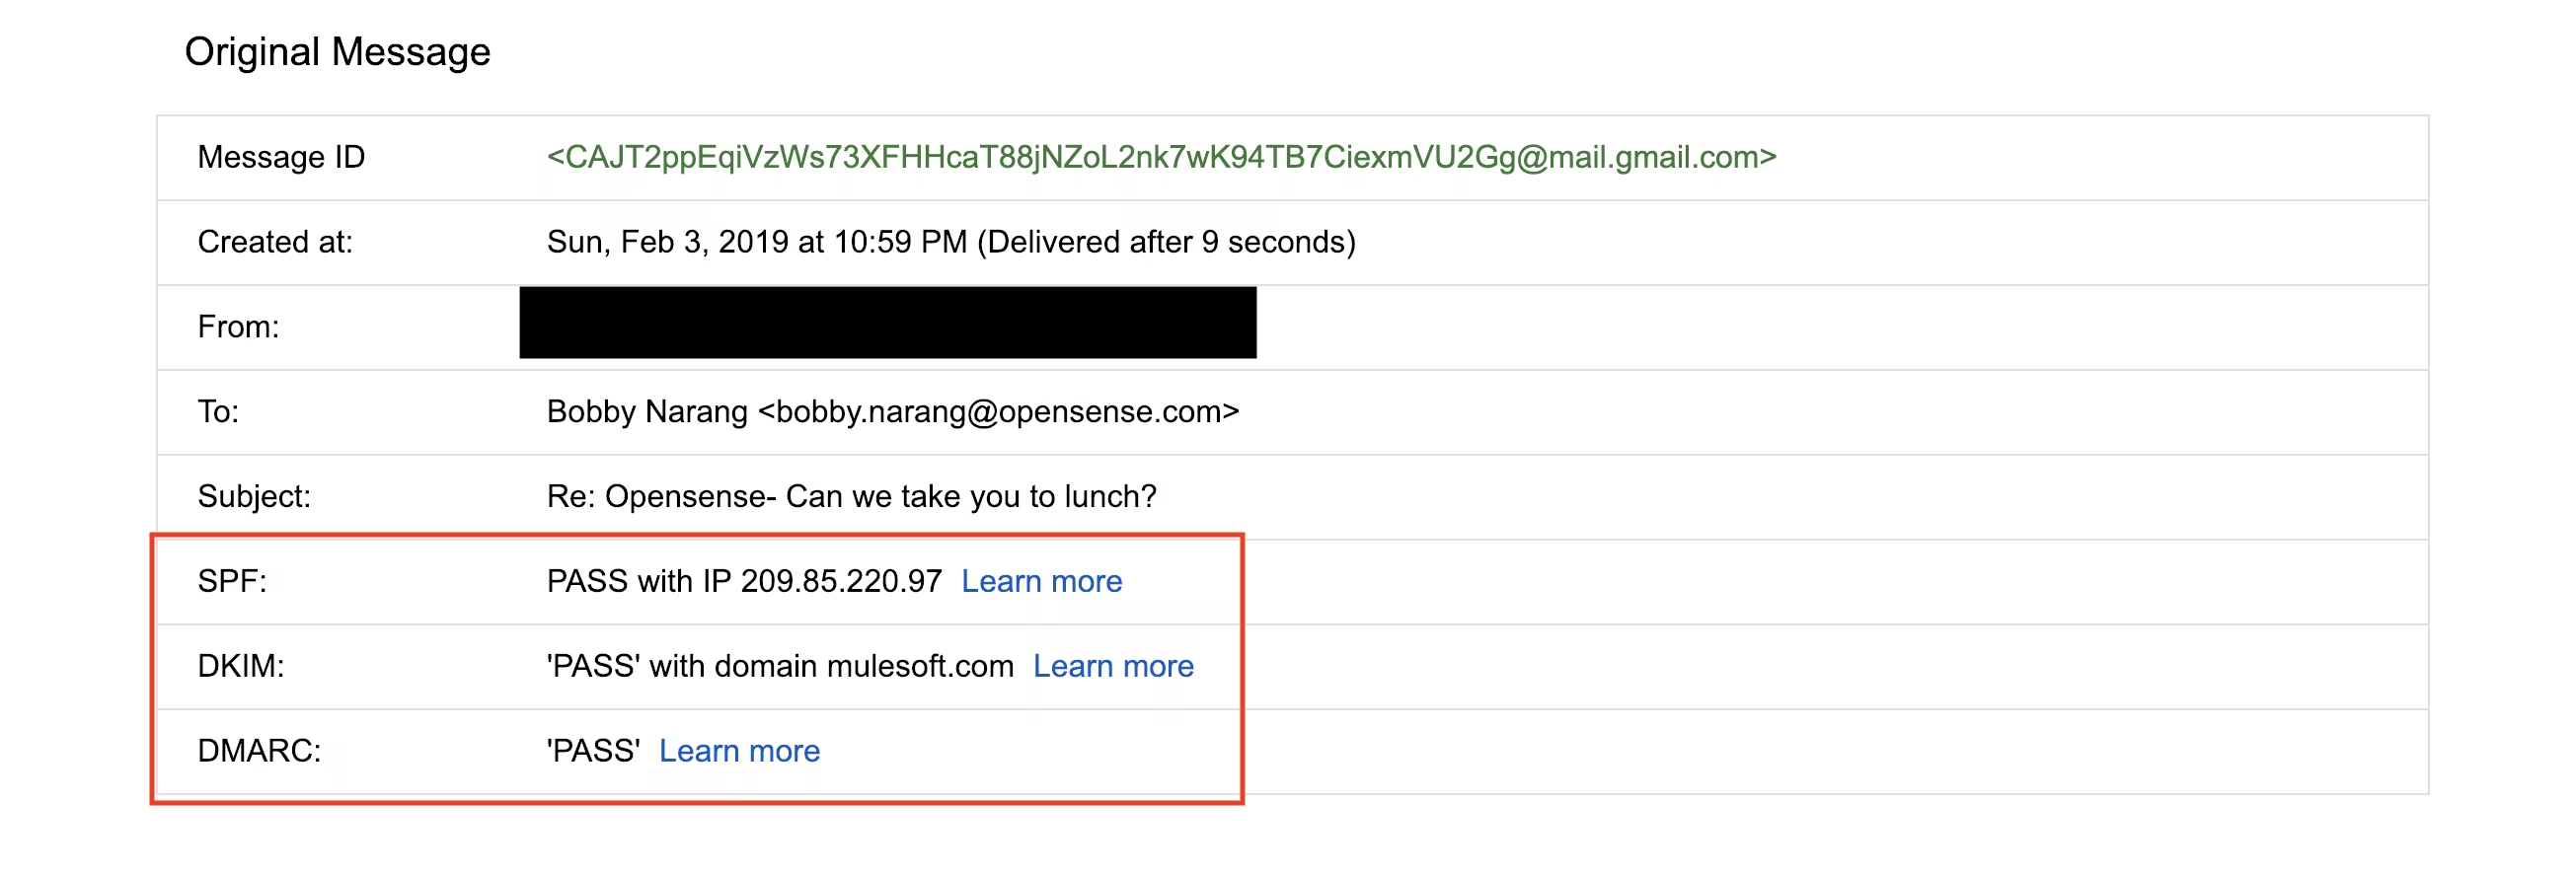
- On Line 6, you should see “SPF”.
- In the IT and email delivery world, SPF stands for Sender Policy Framework.
- SPF is an email authentication method designed to identify forged sender addresses (aka email spoofing).
- Spoofing is a technique frequently used for spam, phishing and malware campaigns.
No, we are not talking about sunscreen.
In the IT and email delivery world, SPF stands for Sender Policy Framework. SPF is an email authentication method designed to identify forged sender addresses (aka email spoofing). Spoofing is a technique frequently used for spam, phishing and malware campaigns. Spoofing is one the banes of email marketing; it’s like pouring poison in a well of fresh water.
To fight the spoofing scourge, SPF helps the recipient email server verify that the email announcing it is coming from a certain domain actually came from an IP address that is authorized by the domain’s administrators. A list of these authorized addresses for a domain is generally published in that domain’s DNS record.
Poorly Configured SPF Settings Can Destroy Your Email Marketing
Now, why would a non-technical employee or manager need to know anything about SPF? Because IT teams that manage email servers frequently misconfigure SPF settings or fail to use SPF records properly. This problem can cause significant percentages of your organization’s emails to end up in spam filters. Naturally, errant spam filtering will impact your email delivery rates, along with all other associated metrics such as CTR. It can also get your email domain blacklisted, which is hard to recover from.
And you - the poor sender of the email, the demand generation team slaving over crafting the beautiful content, or the designer creating beautiful email signature banners - you would never know this is happening unless you check it out yourself.
Ultimately, a misconfigured SPF can cripple your email marketing and outreach efforts, robbing your organization of the one of the most effective, economical and personalized channels for communicating with prospects, existing customers and potential partners.
Fortunately, email marketing experts and sales teams don’t need to be in IT or even be super tech savvy to check whether your SPF records are misconfigured. At least in Google Workspace and Gmail, it's trivial to verify that you SPF is working well. Here’s how to do it.
Step 1: Send An Email From Your Work Address To Your Personal Gmail
Send a quick test email to your personal Gmail account. (Note: you can’t send yourself a test email from your work email to your work email address because Google won’t show the SPF record for senders to and from the same domain).
Step 2: Click “Show Original” In The Test Email In Your Personal Gmail Account
This requires two steps. First, click on the three dots next to the time in the upper right corner of your email. This will open a new drop-down menu. Select “Show Original.”

Step 3: Check the SPF Setting On Line 6
This handy functionality in Gmail shows you all the various fields that IT teams have to configure in your email to tell recipients that the message is not spoofed or spammy. On Line 6, you should see “SPF”. If you email server’s SPF settings are properly configured, it will show “Pass” alongside your IP address. That’s it! If it doesn’t say pass, contact your IT team or email marketing team to let them know there might be a problem.
Come Back Soon For More Tips!
Thanks for reading this quick tutorial. This is the first of a number of email tips for non-email marketing experts and IT people we have planned in the coming year. We think that just about anybody can be an email signature marketing expert and our goal is to equip all of you, dear readers, with that super power. Please send along any feedback or ping us on Twitter (@opensenseapp) or on LinkedIn. Thanks and see you again soon!